How to Create an ERC 223 Token.


In the previous tutorial, we learned how to build a Token using the ERC20 standard, and in this article, we are going to be creating a Token using the ERC223 standard. The ERC20 standard and the ERC223 standard are compatible, meaning that any platform that is working with the ERC20 will also work with the ERC223. But they are both different. The ERC20 Standard is specifically looking at token distribution and delegation while the ERC 223 standard more about protecting your token from getting lost when it is transferred, making sure that where you are sending or distributing the token to is a contract and the tokens are well received by the contract.
The problem facing the ERC20 Standard is that using the transfer function in the standard to transfer a token to another address does not guarantee that the tokens will be sent to the address they are been sent to.
Another problem facing ERC20 Tokens is that the recipient smart contract cannot react to incoming ERC20 Tokens Transfers. All of these problems cause a loss in the token when it is been transferred from one contract to another. This is what the ERC223 Standard was created to solve.
The ERC223 contains two transfer functions. The first Transfer function is the same transfer function for the ERC20 Tokens standards. This is for compatibility with the ERC20 Tokens.
function transfer(address _to uint _value) returns (bool);
The Second transfer function takes a byte argument, that allows you to attached Data to a Transfer.
function transfer(address _to uint _value bytes _data) returns(bool);
The difference between these two functions is that for the ERC223 if the recipient is a smart contract, it is going to invoke a function called tokenFallBack
tokenFallBack(address, uint256, bytes)
on the recipient contract. This is to protect your Token from any loss and makes sure that if the transfer isn't successful, the tokens are sent back to the contract that sent the Token. If the recipient contract does not have or invoke this function then the transaction will fail and the transfer will not occur. That is really the big difference between the ERC20 and the ERC223 Tokens.
There is also no delegated transfer in the ERC223 Standard, so no transferFrom function is included in the ERC20 tokens.
Let us look at how we can implement this ERC223 Standard. We will jump back in our ERC20 code check out how to create an ERC20 Token here from the previous tutorial How to create your own ERC20 Token First, we are going to create a file that has the ERC223 basic standard, that simply implements the basic standard.

Next is we will create a file that contains the functions that should be implemented on the contract we are sending the tokens to.

The only difference between the standard ERC20 and the ERC223 token is we are checking to see if the address we are sending the token to is a contract. We will create a function to see who we are sending to is a contract. This will be added to the token.sol file we created from the last tutorial when we created an ERC20 token
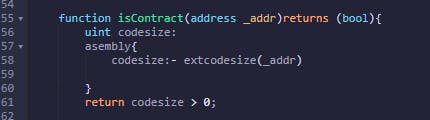
Next is to do an inline assembly as shown in the code above. The reason why we have to do an inline assembly is that this is the way in solidity we actually make a call to an address to see if it is a contract. The uint codesize: shows that if there is a code in the address, and what is the size of that code. In the inline assembly, we are going to use just one method which is extcodesize which means the size of the code at a specific address.
The line codesize:- extcodesize(_addr) means we are allocating the codesize variable we created to the size of the code at the address _addr. This codesize returns a uint value that is greater than 0, and because it is greater than 0, we know it is a contract.
Next, we make sure that the transfer function can only transfer to non-contracts, to do that we add the condition to the transfer function we created in the previous tutorial when creating an ERC20 token.

So what this means is that if the address is a contract, the transaction would be stopped,
Next, we are going to implement the ERC223 transfer function We create a function to accepts the address, value, and bytes of the data passed in the transfer function. We then copy the condition of the function in the ERC20 transfer function and then change the !isnotContract to isContract we will then update the event and add the data to it.

Right before the event, we are going to invoke the contract we are sending data. This is to make sure that the receiving address is a contract. So basically we will instantiate the contract the is receiving the data and then we are sending them the token, who sent it, and how much of it is sent with any additional data.
The code snippet above is added to the transfer function.

This basically how we can implement the ERC223 standard in creating an ERC223 Token, that makes sure that the address it is been sent to is actually a contract and can then prevent any loss of token when a transfer is done to the address.
You can check up the ERC223 standard on github by the creator Dexaran (github.com/Dexaran/ERC223-token-standard) If you'd like to learn more about inline Assembly Language (docs.soliditylang.org/en/develop/assembly.h..)
Follow mw up on my Journey into Blockchain development on twitter (twitter.com/theucheedeoga)