How to Create Your Own ERC-20 Token with Solidity.


Token creation is one of the most important subjects in solidity. Cryptocurrency tokens are used as a store of value/money and are created on a native Blockchain. It is important to state here that there is a difference between coins and tokens.
Coins have their own Blockchain, while Tokens are created and hosted on other Blockchains
Bitcoin which runs on its own Blockchain is not defined as a token but as a coin. The terms coin and token are interchangeably used in the crypto space. They are all used primarily as money or a store of value, but the difference still remains in the Blockchain which they are created on or with.
In order to create a token on the Ethereum Blockchain, you have to follow certain standards. The Ethereum Blockchain provides these standards. These standards provide functionalities that the smart contract must be able to follow in order to create the token. In the Ethereum Blockchain, we have the ERC-20 standards, ERC-223 standards, ERC777 standards, ERC 721 standards etc. But for the purpose of this tutorial, we will be creating the token based on the ERC-20 standards.
ERC(Ethereum Request for Comments) - 20 standards implement an API for tokens with smart contracts. In this standards, it provides functionalities such as transfer of tokens from one contract to another, gets the balance of tokens in an address, total supply of tokens available in the network, etc.
To be to get the functionalities that come with the ERC-20 standard, the smart contract must be able to implement the following methods and events.
function name() public view returns (string)
function symbol() public view returns (string)
function decimals() public view returns (uint8)
function totalSupply() public view returns (uint256)
function balanceOf(address _owner) public view returns (uint256 balance)
function transfer(address _to, uint256 _value) public returns (bool success)
function transferFrom(address _from, address _to, uint256 _value) public returns (bool success)
function approve(address _spender, uint256 _value) public returns (bool success)
function allowance(address _owner, address _spender) public view returns (uint256 remaining)
Now let us explain what these functionalities mean in creating our token
- The function name returns the name of your token. So whatever name you want your token to have will be returned with that function.
- The next function returns the symbol of your token, for example, Etheruem has a symbol of ETH.
- Decimals show the number of decimals that you want your tokens to have. Bitcoins can be divided up to 8 decimal places (0.000 000 01).
- totalsupply simply returns the amount of token that is in circulation in the network.
- balanceOF function finds out the balance of token a specific address has.
- transfer function allows a specific user to transfer tokens from their address to someone else's address.
- transferFrom function allows anyone to specify a user to be able to transfer tokens from his own address to another address.
- approve function allows you as a token owner to allow someone sends or manipulates tokens on your behalf. For example, if you have 100 tokens, you can specify that you want to allow this 10 of my tokens sp he can do with them as he wills. The other address can decide to send the 10 tokens or 5 of them to another address.
- allowance function simply is a way of displaying how much a specific eth address can manipulate another eth address.
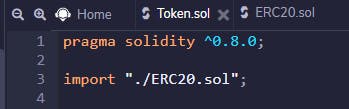
Now we can dive into remix to start creating our own ERC-20 Token. First, before we do that we need to create a file in the remix IDE that contains all these functions and events that the ERC-20 token must be able to implement to create an interface for our token
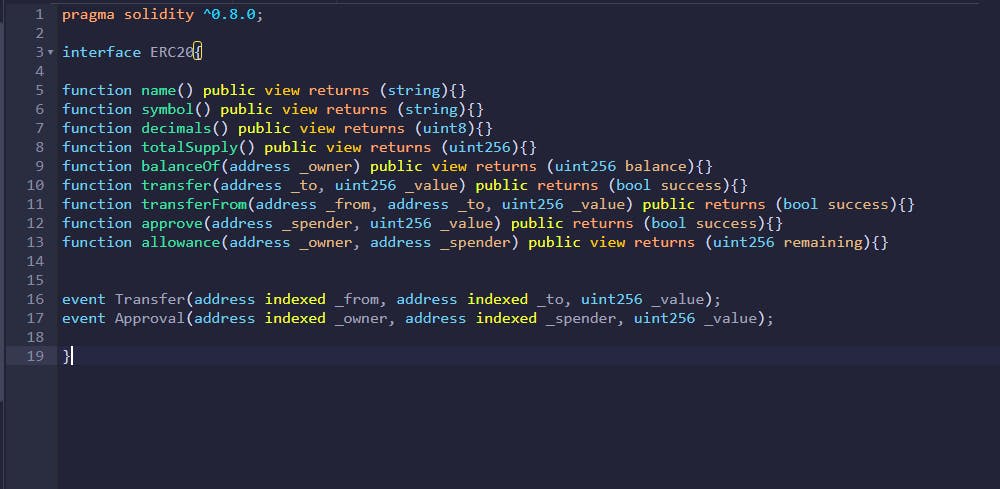
This file contains all the functionalities that are required for the Ethereum Blockchain to know that the smart contract we are about to create is a token.
The next thing is to create another file that will contain the main token creation code. Let us name this file Token.sol. Here we will build out all the functionalities that have been defined in the ERC-20 file. The ERC-20 file that contains all the functionalities will be imported into the new file.
We will then our contract, and then define some of our token parameters.
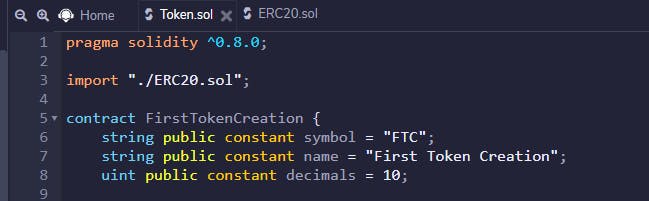
Here we are defining the name of our token, in this case, we name gave the name of our token to be 'FirstTokenCreation'. Then we defined the number of decimals our token should have and then the token symbol.
From the ERC-20 Standard, we are going to create a function that shows us the totalSupply of the token we are going to create, but before doing that, we need to define the totalSupply of the token we are going to create.

Here we have just defined the total supply as a uint that is private(Not accessible to the Public) and is constant(Doesn't change) with a variable name __totalSupply. We then initialize them to the amount we want to be the total supply of the token. We will then go ahead and create the function that shows us the total number of tokens in the network.

The next function to be created is the balanceOF function that returns the balance of token from the owner's address, that is our own address.
Before doing that we will need somewhere to store our balance. Like an address to store our balance, we do this by using a mapping, Check out my article on Mapping in Solidity making it private so it can't be interfered with by the public, and then give the mapping a name "__balanceOf"

Next, we will create the corresponding function to return the balance of the amount that is stored in the address.

This function will return a uint that shows the balance of the amount that is found in the address.
We will next create the transfer function to be able to transfer tokens from the sender's address to another address. if successful it returns true. But before we create that we have to first check a condition to be able to have a successful transaction.
- Do we have enough tokens in our address to be able to make a transfer?
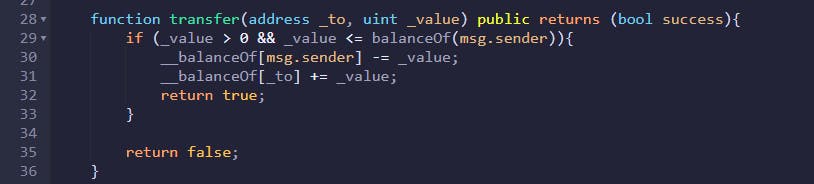
In the function, the function parameters show that we specify the address and the value we are sending the tokens to, and if the condition is met then we should return true else return false. The condition in the function above states that if the value of the token we are sending is less than or equal to the balance of the sender(that is the address used in creating the contract, which is our address), then our balance will be reduced(the value of tokens will be deducted) and the balance of the address we are sending the tokens to will increase by the value of tokens received.
Let's move on to the next ERC-20 standard we are going to implement in creating our token.
The approve function: This function allows us to give permission to another address to send or manipulate a certain amount of the value of our tokens on our behalf. The first thing we have to do with the function is approved that someone(Another address) has approval to a certain amount of value of our token. This means we are going to be needing another mapping structure. Since we are going to map an address to another address we are going to be using the nested mapping(mapping of a mapping).

what this means is that our address has been mapped or connected to another address mapped to a value. All this is controlled or approved by our own address.
Let's create the corresponding function that returns true if the approval of the spender's address is successful.

This function means that the sender allocates a certain amount of value of the token to the spender to do whatever he wills. Since this is now showing the specific amount that the spender has in his own address, let us move on to implement the allowance function that shows a way of displaying how much a specific address can manipulate another address.
we will also need to make sure a condition is met before this function can work. In this case, the condition that needs to be true is making sure that the allowance exists by the owner of the address which is the sender of the value of a token.

Next, we need to implement the transferFrom standard into our code, which allows a specific user to transfer tokens on the owner's behalf. We have a couple of conditions that must be met before this can be done.
First, we check if the allowance from the address to manipulate the tokens on its behalf.
Then check specifically if there is allowance to send a message and this what is sent from the address is greater than zero and the value is greater than zero.
- Also check if what is sent from the sender is greater or equal to the value that is inputted.
When all of these conditions are checked and are true, then the balanceOf the main owner address will reduce(i.e the value of token has been successfully transferred into another address) and the balanceOf of the address the token is been transferred to will increased(when the value transferred is added).
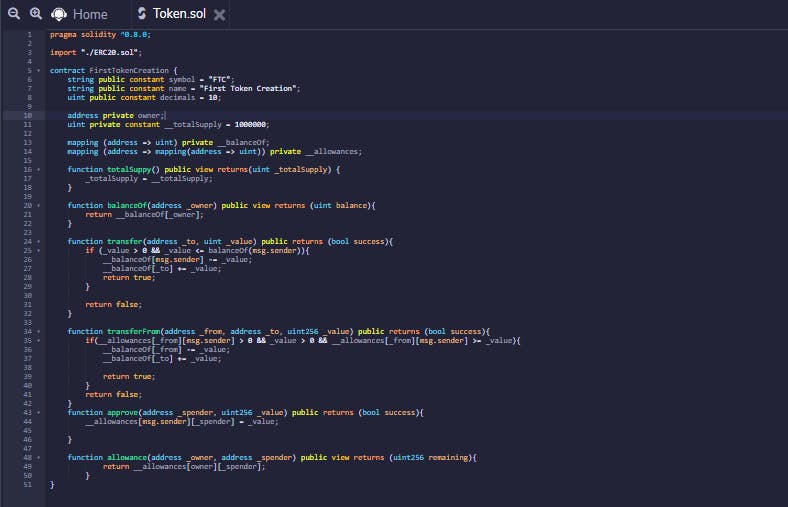
Now let us see the entire code containing all the implementation of the ERC-20 Standard we have covered in this tutorial.
Let us go ahead and compile the contract and deploy it to see if our contract worked.
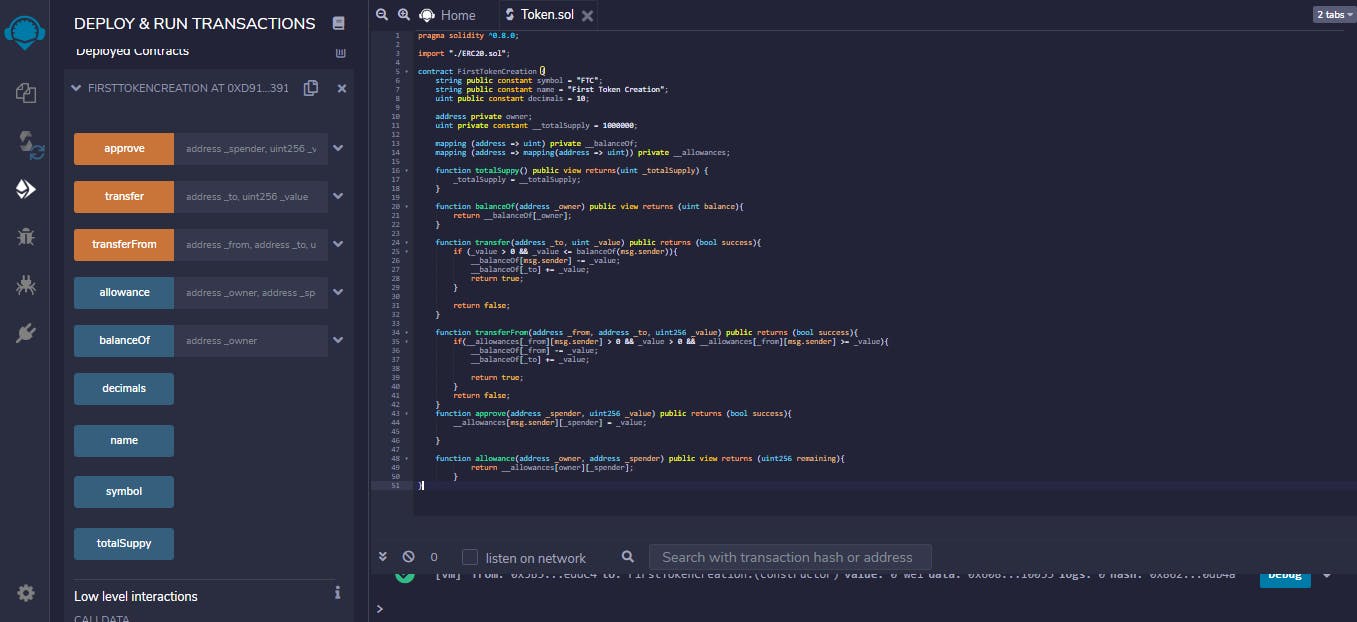
HURRAY!!! our contract was successfully deployed and our token has been created. You can interact with the contract to know if the functions are working properly. So congratulations you just successfully created your first ERC-20 token on the Ethereum Blockchain. If you find this article useful please follow me on Twitter to be able to follow my journey in learning solidity and becoming a blockchain developer.
other important resources on creating an ERC-20 token. (ethereum.org/en/developers/docs/standards/t..) (eips.ethereum.org/EIPS/eip-20)